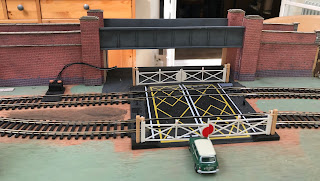
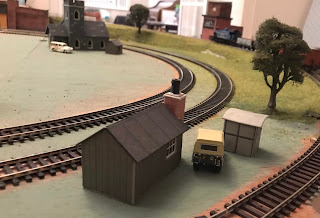
It's far from finished but I thought I'd document my first attempt at doing some scenery for the model railway. The thing is I was never "good" at art at school, mainly because of my lack of colour sight always making me think I couldn't "do" art. But that that doesn't stop one being creative and although my art teacher could not comprehend the colour issue, I've found other ways to be creative that don't involve distinguishing red from green or blue from purple.
Adding scenery to the layout was always part of the deal. It began with some of the buildings about which I have already written. But what about grass and trees etc? Well, here's the progress so far.
It still need more grass adding, but I'm waiting for a better state grass applicator to arrive. For those who don't know, static grass doesn't refer to a lack of movement but the way it is applied. It uses a static charge to make the grass fibres stand up. You can do this with a plastic bottle, but that doesn't seem to have worked particularly well.
I've used a process I saw in a video by Kathy Millat, although the layering spray I bought was the same product it was not in the spray can but an aspirating type bottle which may have made a bit of a difference. I also used a puffer bottle rather than the electrostatic applicator which I have now ordered to try on the next area.
The trees came ready made from Model Scenery Supplies, as did much of the static grass. I built the embankment from PIR insulation board (Cellotex in my case). It's easy to carve and shape using a sharp kitchen knife.
Small gaps were filled with decorators caulk. On reflection a more rigid filler might have been a better choice but this was what I had lying around in the workshop.
Once that was all dry we covered it with strips newspaper and used standard PVA glue to fix it all in place.
I wasn't too worried about making it super smooth because that wasn't the finish I wanted. I wanted something uneven and less cultivated looking.
Once dry it got a coat of poster paint to give a soil like base. Even at this stage it was looking okay although there were a few cracks that needed sorting out. I painted a few area white and grey using acrylics and washed them with a black wash to make bits of chalk face show through.
Some got covered up with grass when I forgot to avoid them with the base glue and layering spray!
Which brings me to the grass application process. As I mentioned, I didn't;t find the puffer bottle that easy to use. I ended up spraying grass fibres all over the place. That's not a big problem, but I did feel that it made getting the stuff in the right place a bit of a chore. I also found that the base glue went off very quickly. Perhaps the painted paper absorbed it too quickly and Male a base coat of PVA to seal the surface first might have helped.
In the end I'm quite pleased with how it's turning out. Having added some line-side fencing and a few tress has made this corner of the layout really come to life.
Friday, August 23, 2019
Tuesday, August 20, 2019
Building a bridge
Sadly I didn't take any pictures of the process of building the bridge. A bit of an oversight given that my plan was to document the process!
It started with a simple prototype made from from 6mm MDF. Nothing more that a couple of supports and the flat bed for the track.
Once I'd figured out the height I built the bridge and added the side sections, all made from MDF.
The girders were 3D printed, primed in grey and then painted with a black acrylic wash to make them grimy.
With the girders superglued in place I set about building the walls.
These are simple card construction. The retaining walls are about 7mm thick and made from two layers of 3mm card and between two layers of brickwork card (Metcalf again). They are actually from the platform kit
I applied the red brick to the main walls first and then added the abutments.
These are made from more MDF. I was going to 3D print them but MDF was quicker. This was a card prototype. You can see the L-shape, the shorter part sitting facing towards the track.
The retaining walls were glued to a strip of stone capping from another kit and the glued in place with the capping overhanging the retaining wall. I thought this added depth and gave it a more authentic look. They were capped off with more stone and one side I went for a slopping finish and the other has a stone end pillar.
The end result is quite pleasing and once again shows that model-making isn't as difficult as it might look. I'm still learning better ways of doing things, but as that say, this is my model railway and the only person I really need to please is myself.
Prototype bridge |
Once I'd figured out the height I built the bridge and added the side sections, all made from MDF.
The girders were 3D printed, primed in grey and then painted with a black acrylic wash to make them grimy.
With the girders superglued in place I set about building the walls.
These are simple card construction. The retaining walls are about 7mm thick and made from two layers of 3mm card and between two layers of brickwork card (Metcalf again). They are actually from the platform kit
I applied the red brick to the main walls first and then added the abutments.
Prototype Abutment |
The retaining walls were glued to a strip of stone capping from another kit and the glued in place with the capping overhanging the retaining wall. I thought this added depth and gave it a more authentic look. They were capped off with more stone and one side I went for a slopping finish and the other has a stone end pillar.
The end result is quite pleasing and once again shows that model-making isn't as difficult as it might look. I'm still learning better ways of doing things, but as that say, this is my model railway and the only person I really need to please is myself.
Monday, August 19, 2019
A 3D printer? I can't see the point of one myself!
Well actually I can! It's a pain sometimes, but a 3D printer is a real bonus when it comes to developing my model railway. Originally I bought one (Creality Ender 3) because I wanted to explore the world of 3D printing. I had an idea and a 3D printer was an obvious part of the solution to the problem I was trying to solve.
I started to play with some design ideas for the workshop and then when the model railway began to take shape it really came into its own. I've printed parts for models (doors and roof vents for example), small items (milk churns and oil drums) and trackside fencing. I've also printed a church, chimney pots, stove pipes, bridge sections and garden sheds. Quite a collection.
Some I've designed myself, some I've downloaded from thingiverse. Here's a little gallery of some of the things I've printed.
Chute |
Stove pipe and roof vents for disused carriage |
Country Church |
Chimney stack and doors. |
Oil drums and milk churns |
Saturday, August 17, 2019
Small Factory Unit Build
When I printed the church there was a large piece of waste from the the supporting structure the 3D printer produces to support the overhanging parts of the print.
Initially it was head for the recycling bin but then I thought I must be able to do something with it. So it sat around for a while and then I thought about Turing into a building of some sort. I settled on a factory and began to work out what to do.
The first thing to do was to glue the two pieces together to give the basic shape of a building with a chimney.
Most of the factories I remember from my childhood had whitewashed windows. To make these I decided to paint the window area quite roughly before adding the walls with window cutouts.
I used some Metcalf red brick card and wrapped the building. On the chimney I made a layer of engineering brick and then overlaid the join with some roof material that came with the brick card.
A factory obviously needs doors and a roof. I'd bought the rusty corrugated panels and roof lights already because I wanted to use them on the aggregates works. On that build I used superglue but it wasn't the easiest way to glue them place (although they are fine). This time I tried epoxy resin and that has worked quite well and it has the advantage that you don't accidentally end up sticking your fingers together!
A bit more 3D printing and we had the chimney top and some doors.
To finish off I added some barge boards and some guttering and a downpipe. A little more weathering and this is how a waste piece of plastic became a factory.
Friday, August 16, 2019
Finishing off the aggregates works
So the rusty metal panels arrived and have been fitted along with a roof to complete the building that has become an aggregates depot.
I did say that we were adding things that connected with out life and this has been named after our two grandsons Tobias and Ben.
I might add a second sign above the double doors, but apart from that it's finished.
I need to develop the area around it now-paint the base and texture it, add a few bits and pieces like some ladders and maybe some scrap.
We shall have to wait and see.
The next building project is to make use of the support structure left over from the 3D church print. It seems a waste to throw it away, so it's going to be turned into a small factory unit of some kind.
I'll use more of the corrugated panel for the roof and add some skylights. I'll print a chimney top and some doors to give it some depth.
In between finishing off the works I made a start on the platform for the station. I've ordered a station kit, but it will need a bit of adapting. Either that or a complete rethink if the station position which in turn might make some changes needed to the layout.
We've also had two trains running at a time which is quite exciting. I'm yet to really get to grips with how to wire the whole thing, but I've got a couple of controllers and each is connected to a loop of the track so we cans ee them running.
Here's a short video of it all running. It's oddly satisfying to see these two small trains going round and round in opposite directions!
Wednesday, August 14, 2019
Battered old fruit wagon
Being new to this whole model-making malarky I've been trying out various kits and model making processes.
In the last post I talked about card kits, self build and 3D printed. This one is a laser cut kit made from both card and 3mm thick MDF. It's very straightforward to build and is just the wagon. I decided to make it a repurposed wagon, doubling as a workshop or stores-I haven't decided which just yet.
The card panels lack definition and the lines for the doors have all but disappeared under the paint. I don't have a steady enough hand to pick them out with a fine brush, but I might be able to use a pencil the create some false shadows and give the side panels a bit more depth. If I try that I'll apply a fixing coat to seal the finish.
The kit is just the body of the wagon. If you wanted to run it you would need wheels etc for it. Any extras like the vents (3D printed from my own design) or the chimney (again a 3D print) have to sourced for elsewhere.
I'd certainly consider using one of these again, but at the moment I think to Metcalf kits are the best I've tried. Then again they are for buildings so comparing a wagon model to them isn't quite fair.
What goes where?
Building the model railway is coming along slowly. I never saw it s a weekend job but rather a 3 or 5 year project. Having never done anything like this before, getting a sense of scale is quite difficult. how big are the buildings? What does a bridge look like at 1:76 scale (I'm building in 00 gauge)?
With most of the track down it was time to build something and see what it looked like. Our first building was the signal box. It's made from a pre-cut card kit by Metcalfe's.
Here it is in its almost finished state. Since this picture was taken I printed a chimney for it and there were two other buildings in the kit, a line side hut and a small shed-like building.
The kits are fairly straightforward to put together although you do need to take your time and separating the parts can be a bit tricky. You need a good sharp modelling knife and a lot of patience.
The next idea was to try something using off cuts of mdf that are lying around in the workshop. The plan with the layout is to include things that connect with the family and with things we've done, places we've lived etc.
Again it's not quite finished, but here's a picture of the progress on my first scratch built model.
I'm waiting for some rusty corrugated panels to arrive in the post for the top section. This is a mixture of bits, some printed some card and some mdf. The brickwork is printed card glued to the main mdf structure. The chute and sliding doors are 3D printed. The aggregate is model railway ballast and the coping around the top of the wall is 3mm thick card.
I've also tried to weather it using acrylic paint. The brush is dipped in the paint and then moist of the paint removed before brushing it randomly along the edges and around the walls.
Once it's finished I'll try and post some better pictures.
My third building was a download kit that you print and then glue to card. It came from Scalescenes. They have a free kit for you to try so I downloaded that and gave it a go.
Here it is in the foreground. The kit is a more of a challenge than the laser cut kits, but if you make a mistake cutting something out, you can always print another version and try again. It's also now got a chimney courtesy of the 3D printer.
The 3D printer has also been to use for another model. I downloaded a church from thingiverse. It took nearly 3 days to print, but even then the relative cost when compared to kit was very good.
It was also the first time I've painted something. Not being colour sighted makes painting a challenge, but this was a grey stone building so hopefully I'd be okay!
It's turned out quite nicely. It was primed using a spray primer from Halfords and then painted with the acrylics. The final stage was to use a black wash to give it some depth.
So there you have it. Different ways to create building for the layout. I'm not sure any is better than another, they all have a place. Mixing the forms works well. But that's not unexpected.
I'm currently working on a bridge and I've just built a fish wagon! Pictures to follow!
Friday, August 09, 2019
Building a simple turntable for painting models
I'm not much of an artist but one of the things that I need to learn is how to paint and weather models for the railway. To make it easier a small turntable looks like a useful item to have. Now you can of course go out and buy one but I've got a workshop full of scraps of wood and stuff so I thought let's make one.
It's a simple enough design-a circular table on a square base. Both are made from 18mm ply that was lying around the workshop.
Cutting the circular turntable was interesting. I decided to do it on the table saw. I'd seen someone do this and thought I'd give it a try. It's fairly straightforward and produced a really good cut. I could have used a router and circle jig, but this was quicker to set up and do. you just have to be steady and not try to do too much too quickly. I have a 12mm base that sits in the mitre slot and I simple screw fixed the blank to it cutting off the corners and gradually cutting smaller and smaller pieces away until I got the circle.
The square base has a bolt through it to provide a spindle for the rotating table. It's held in place with a counter bored nut.
The rotating table has another counter bore into which a bearing has been pressed. The bearing is for a skateboard and is about 20mm in diameter. A washer over the nut provides a small amount of separation between the table and the base.
Because the bolt head isn't recessed into the base I glued and pinned four triangular feet to it. These were scraps from something else I made recently and they are 9mm ply.
I then put a liberal coat of wax on the base and the turntable surfaces that meet just to help.
I made a second one using just a screw through the top and washer between the base and turntable. This works okay too.
Saturday, August 03, 2019
Inside to outside
Having been away on holiday I got back to testing bits of the track on our model railway. There are some issues with derailing rolling stock through the points, but I hope to get that sorted out as I finish laying the track and making sure it's as smooth as possible.
One of the common solutions to rolling stock derailing is lack of weight in the wagons and carriages. Adding the right amount of weight should help keep the trains on the tracks. We shall have to see! Another issue can be the play in there wheels. If there's too much (more than 1.5mm) the wagon can jump the tracks as it goes through a set of points. So there are a few things to look at.
Having connected up all the track I ran both the freight train and the passenger train through. The passenger train managed it better than the freight train, but both need attention.
Here's a short video of the Flying Scotsman going from the inside track, around the centre loop and up onto the outer inclined loop:
Subscribe to:
Posts (Atom)